Docker is used to run network services such as web and database servers. Docker has networking options to connect containers together. You can put containers in a private networks where each container on the private network can talk with each other, but they are isolated from the rest of the containers running on your computer. You can also expose network ports to sending data into and out of the system. We will be covering docker networking with some examples.
- Example 1 – Send data from container to host computer by specifying both inside and outside ports as seen from inside the container and on the outside.
- Example 2 – Send data from container to host computer but let docker choose the ports from unused ports.
- Example 3 – Send data from container to other containers.
- Example 4 – Using UDP for communication.
Example 1: Create a docker container and open ports. The server will accept data from one client and then pass it to another client. We will use netcat (nc) linux command to send data from a local client to the container server which will then forward the data to itself and afterwards pass it to another client. netcat is a computer networking utility for moving bits from one place to another over network connections using TCP or UDP. It’s a simple way to show networking without having to start a web server.
The first thing to do is create the docker container and open ports for communication. Open a terminal screen and create a container using the following command:docker run --rm -ti -p 45678:45678 -p 45679:45679 --name serverOne ubuntu:14.04 bash
This command opens the ports 45678 and 45679, the name of the container is serverOne, it uses ubuntu 14.04 for this example. This command will open the bash shell of the container. In this bash shell run the following command to have data passed into our system on one port and then spit out on another port.nc -lp 455678 | nc -lp 45679
Next, open two more terminal screens. In the first screen, run:nc localhost 45678
In the second terminal screen run:nc localhost 45679
The image below shows the setup.

Now we can send data from the client 1 to the server and the server will pass the data to client 2

You can clear all the terminals at this point and close the docker terminal.
Example 2: We will do the same as example 1 but let docker choose from unused ports. Open three terminal screens.
Run the following command to start the container (server) in the first terminal:docker run --rm -ti -p 45678 -p 45679 --name serverOne ubuntu:14.04 bash
Notice, we did not specify the outside port. Start the netcat for listening on ports:nc -lp 45678 | nc -lp 45679
Run the following commands to see the outside ports assigned by docker:docker port serverOneserverOne is the name of the docker container that we created earlier. It will output the outside ports.45678/tcp -> 0.0.0.0:3276945679/tcp -> 0.0.0.0:32768
Run the following command in the second terminal to start netcat and connect with the server:nc localhost 32769
Run the following command in the third terminal to start netcat and connect with the server:nc localhost 32768
Now the clients can talk with each other through the server. See the image below of the three terminal screens.

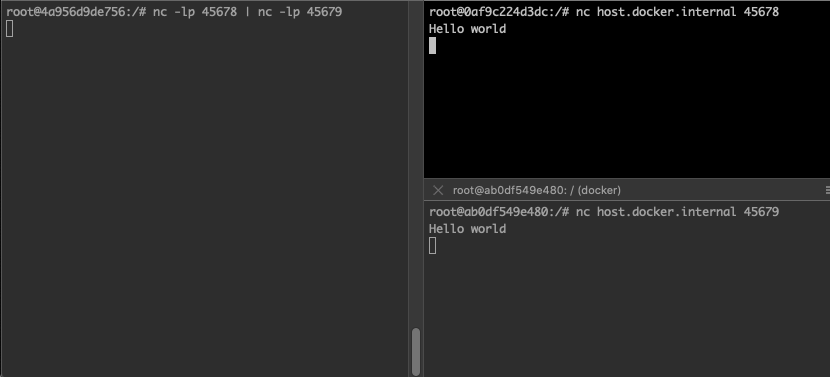
Example 3: In this example, we will do the same as the last example but instead our clients will be containers as well. This is useful when your local computer does not have netcat, so you need to run netcat from inside the container.
We will have three terminals in this example as well each running in a container. The first container is the server and the other two are clients.
Run the following command to start the first container (server) in the first terminal:docker run --rm -ti -p 45678:45678 -p 45679:45679 --name serverOne ubuntu:14.04 bash
Start the netcat for listening on ports:nc -lp 45678 | nc -lp 45679
Run the following command to start the second container (client 1) in the second terminal and start netcat:docker run --rm -ti ubuntu:14.04 bash
Start the netcat to refer to the host computer:nc host.docker.internal 45678
Run the following command to start the third container (client 2) in the third terminal:docker run --rm -ti ubuntu:14.04 bash
Start the netcat to refer to the host computer:nc host.docker.internal 45679
Example 4: In this example, we will use the UDP communication instead of the default tcp communication. We will use two terminal screens in this example to make it easy for ourself. Client will send data to the server over UDP.
Create the server using the following command:docker run --rm -ti -p 45678/udp --name serverOne ubuntu:14.04 bash
Notice udp after the port number. Run the following command in the container for UDP communication:nc -ulp 45678
Run the following command in the second terminal to view the outside port assigned by docker:docker port serverOne
It will output:45678/udp -> 0.0.0.0:32768
Run the following command to start communicating over UDP:nc -u localhost 32768
Now the client can send message to the server.
